Yarn hooking is easy to master and appeals to the beginner or experienced crafts person. It is a wonderfully, rhythmic, relaxing and therapeutic craft and has the benefit of ‘growing’ quite quickly and the design soon emerges. You will be hooked and find yourself saying – “I’ll just do a bit more”!
Each kit contains the yarn, hessian with the design drawn on, custom made hooking tool, colour swatch, pattern which shows which colour to hook where and a full page of hooking instructions. This is all contained in a Hooked by Design canvas project bag.
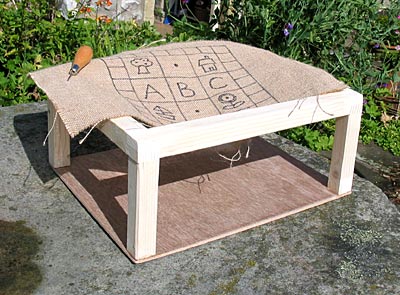
When hooking, the hessian must be attached to some kind of frame which holds the hessian taut whilst at the same time freeing both hands – one to hold the hooking tool and one hold the yarn.
I make custom made Hooking Frames (approx 13” x 11”). These are light and sit nicely on the knee allowing you to hook in a comfortable position. Buy here.
If you are right handed (holding the hook in your right hand) you will always hook from right to left. The hooking frame allows you to hook around the outline of a shape by turning the frame – so that you continue hooking from right to left. If you are left handed (holding the hook in your left hand) you will be working from left to right.
We suggest going around the outline of a shape first and then filling it in. Complete the hooking area which is on your frame and hook any details of the design first and then hook the background last. Once completed, remove the drawing pins and take the hessian off the hooking frame and reattach to a new area of hessian to be hooked. Repeat until your design is completed.
All your starting and finishing ends of yarn should be brought up to the top of the hooking frame (the right side). There is no knotting or finishing off on the underside of the hessian. These ends can be trimmed off to the same height as the loops either as you are hooking the design or at the completion of all the hooking.
Finishing your design
When you have finished hooking lay the completed design face down and press the underside with a hot iron, using a damp cloth to protect the yarn.
You will find that you have roughly 3″ (7-6mm) of hessian border – do not trim this off!
If you are working on a cushion, simply make up in the usual way using your chosen backing fabric. An envelope style cushion is a very easy way to make a cushion – I often use vintage blankets for the backing fabric.
If you are working on a rug, turn the hessian underneath the pattern, leaving a fold of about 1/ 4″ (7mm) showing at the edge. Using a darning needle and the colour of yarn suggested in your pattern, whip-stitch over the exposed fold on all sides of the rug.
Hand-sew the woven tape over the raw edge of the hessian on the underside of the rug.
Finally…
Keep any left-over yarn. Hooked by Design uses hard-wearing 100% wool carpet yarn but if you should stain your carpet or cushion, you can simply pull out the affected area and re-hook it with the saved yarn. For normal cleaning purposes, the finished products should be dry-cleaned or hand washed in cool water.
You may notice slight variations between the colours in the photographs and the yarn in your kit. We have made sure that all the yarn within your particular kit is a consistent colour.
Happy hooking!